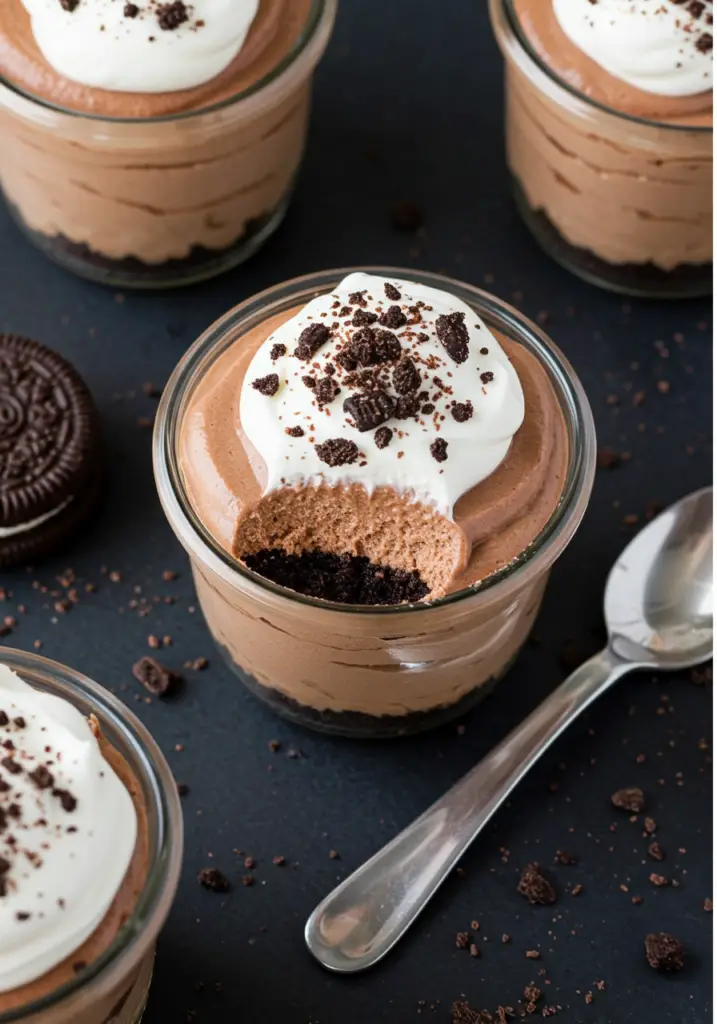
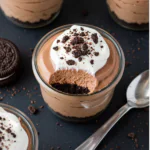
If you love the rich flavors of chocolate and coffee, these No-Bake Mocha Cheesecake Cups are the ultimate indulgent treat. With layers of creamy mocha cheesecake, a crunchy cookie base, and a cloud of whipped topping, they’re a perfect make-ahead dessert that looks elegant but takes minimal effort. No oven needed—just chill and enjoy!
Perfect for dinner parties, holidays, or simply treating yourself to a cozy, café-style dessert at home.
Want recipes like this delivered straight to your inbox? Subscribe now to get the latest culinary creations you’ll love.
Why You’ll Love This Recipe
No-Bake Convenience – No oven required, perfect for warm days or quick prep.
Bold Mocha Flavor – Rich coffee and chocolate flavor packed into every spoonful.
Individual Servings – Great for portion control and easy entertaining.
Make-Ahead Friendly – Perfect for prepping in advance.
Decadent Yet Light – Creamy filling with a whipped finish that’s never too heavy.
Ingredients You’ll Need
For the Cookie Crust:
- 1 cup chocolate cookie crumbs (like Oreo or chocolate graham crackers)
- 3 tbsp unsalted butter, melted
For the Mocha Cheesecake Filling:
- 8 oz cream cheese, softened
- ½ cup powdered sugar
- 1 tbsp cocoa powder
- 1 tbsp instant coffee or espresso powder
- 1 tsp vanilla extract
- ½ cup cold heavy cream
For the Topping:
- Whipped cream (store-bought or homemade)
- Chocolate shavings, mini chips, or dusted cocoa (optional garnish)
Tools You’ll Need
- Electric hand mixer or stand mixer
- Mixing bowls
- Spatula
- Measuring cups and spoons
- 4 to 6 small serving cups or jars
- Piping bag or spoon for neat assembly
Step-by-Step Instructions
Step 1: Prepare the Cookie Crust
In a bowl, mix the chocolate cookie crumbs and melted butter until evenly combined.
Spoon 1–2 tablespoons into the bottom of each cup or jar and press down to form a crust layer.
Set aside.
Step 2: Make the Mocha Cheesecake Filling
In a large bowl, beat the softened cream cheese until smooth and fluffy.
Add powdered sugar, cocoa powder, instant coffee, and vanilla extract. Mix until well blended.
In a separate bowl, whip the heavy cream until stiff peaks form.
Gently fold the whipped cream into the mocha cream cheese mixture until fully combined and airy.
Step 3: Assemble the Cups
Spoon or pipe the mocha cheesecake filling over the cookie crust in each cup.
Smooth out the tops or create a swirl using a piping tip.
Cover and chill in the refrigerator for at least 2 hours, or overnight for best results.
Step 4: Add Toppings and Serve
Right before serving, top each cheesecake cup with a dollop of whipped cream.
Garnish with chocolate shavings, mini chips, or a dusting of cocoa or coffee powder if desired.
Serve chilled and enjoy!
Tips for Perfect No-Bake Mocha Cheesecake Cups
Use Room Temperature Cream Cheese – This ensures a smooth, lump-free filling.
Whip Cream Separately – Adds volume and a light, mousse-like texture.
Adjust Coffee Intensity – Use less or more instant coffee depending on your taste.
Clear Cups for Presentation – Showcase those beautiful layers!
Don’t Skip the Chill – This helps the filling firm up and hold its shape.
Serving Suggestions
Dinner Party Dessert – Elegant and mess-free for guests.
Coffee Bar Companion – Serve alongside lattes or iced coffee.
Special Treat – A luxurious ending to a date night meal.
Holiday Dessert Table – Add crushed peppermint or flavored whipped cream for seasonal flair.
How to Store & Make Ahead
Storing:
Keep cups covered in the refrigerator for up to 4 days.
Avoid freezing, as the texture may change when thawed.
Making Ahead:
Prepare the crust and filling a day in advance.
Add whipped cream and garnishes just before serving to maintain freshness and presentation.
Frequently Asked Questions
1. Can I make this caffeine-free?
Yes! Use decaf instant coffee or skip it altogether for a chocolate cheesecake version.
2. Can I use a different crust?
Absolutely. Graham crackers, digestive biscuits, or even crushed vanilla wafers work great.
3. What if I don’t have heavy cream?
You can use whipped topping as a substitute, but texture and richness may vary slightly.
4. Can I make this in one big dish instead of cups?
Yes. Use an 8-inch square dish or pie plate and cut into slices once set.
5. How do I make this dairy-free?
Use dairy-free cream cheese, plant-based whipped cream, and cookies that fit your dietary needs.
Final Thoughts
These No-Bake Mocha Cheesecake Cups offer the perfect blend of creamy, chocolatey, and coffee-rich flavors in a single-serve dessert. They’re elegant, easy to make, and sure to become a favorite for both casual and special occasions. Keep them in your fridge and you’ve got dessert ready anytime—no oven, no stress.
Make a batch today and indulge in the ultimate no-bake treat!
Preparation Time: 15 minutes
Chill Time: 2 hours
Cuisine: American
Nutritional Information (Per Serving, based on 6 cups):
Calories: 295 | Protein: 4g | Carbohydrates: 19g | Fat: 23g | Fiber: 1g | Sodium: 160mg
No-Bake Mocha Cheesecake Cups
- Total Time: 15 minutes
Description
If you love the rich flavors of chocolate and coffee, these No-Bake Mocha Cheesecake Cups are the ultimate indulgent treat. With layers of creamy mocha cheesecake, a crunchy cookie base, and a cloud of whipped topping, they’re a perfect make-ahead dessert that looks elegant but takes minimal effort. No oven needed—just chill and enjoy!
Perfect for dinner parties, holidays, or simply treating yourself to a cozy, café-style dessert at home.
Want recipes like this delivered straight to your inbox? Subscribe now to get the latest culinary creations you’ll love.
Ingredients
For the Cookie Crust:
-
1 cup chocolate cookie crumbs (like Oreo or chocolate graham crackers)
-
3 tbsp unsalted butter, melted
For the Mocha Cheesecake Filling:
-
8 oz cream cheese, softened
-
½ cup powdered sugar
-
1 tbsp cocoa powder
-
1 tbsp instant coffee or espresso powder
-
1 tsp vanilla extract
-
½ cup cold heavy cream
For the Topping:
-
Whipped cream (store-bought or homemade)
-
Chocolate shavings, mini chips, or dusted cocoa (optional garnish)
Instructions
Step 1: Prepare the Cookie Crust
In a bowl, mix the chocolate cookie crumbs and melted butter until evenly combined.
Spoon 1–2 tablespoons into the bottom of each cup or jar and press down to form a crust layer.
Set aside.
Step 2: Make the Mocha Cheesecake Filling
In a large bowl, beat the softened cream cheese until smooth and fluffy.
Add powdered sugar, cocoa powder, instant coffee, and vanilla extract. Mix until well blended.
In a separate bowl, whip the heavy cream until stiff peaks form.
Gently fold the whipped cream into the mocha cream cheese mixture until fully combined and airy.
Step 3: Assemble the Cups
Spoon or pipe the mocha cheesecake filling over the cookie crust in each cup.
Smooth out the tops or create a swirl using a piping tip.
Cover and chill in the refrigerator for at least 2 hours, or overnight for best results.
Step 4: Add Toppings and Serve
Right before serving, top each cheesecake cup with a dollop of whipped cream.
Garnish with chocolate shavings, mini chips, or a dusting of cocoa or coffee powder if desired.
Serve chilled and enjoy!
Notes
Use Room Temperature Cream Cheese – This ensures a smooth, lump-free filling.
Whip Cream Separately – Adds volume and a light, mousse-like texture.
Adjust Coffee Intensity – Use less or more instant coffee depending on your taste.
Clear Cups for Presentation – Showcase those beautiful layers!
Don’t Skip the Chill – This helps the filling firm up and hold its shape.
- Prep Time: 15 minutes
- Cuisine: American