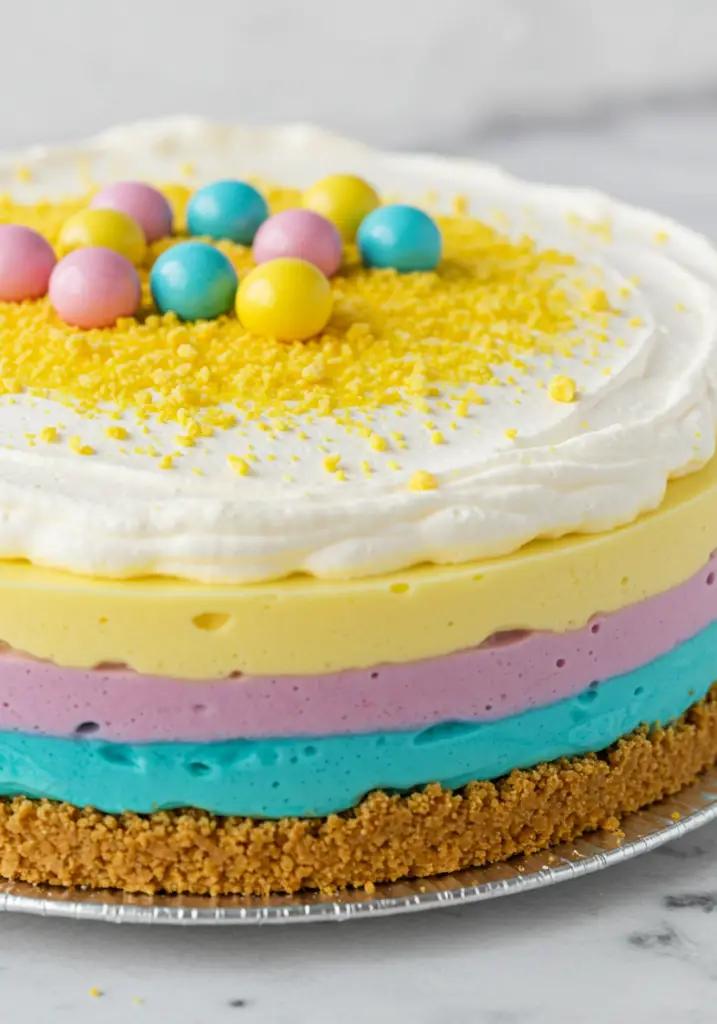
This Easter Jell-O Pie is a vibrant, fun, and easy dessert that’s perfect for your Easter celebration! With its colorful layers of fruity Jell-O and a creamy filling, it’s not only visually stunning but also incredibly refreshing. The best part? It’s a no-bake dessert that’s simple to make and can be prepared ahead of time, giving you more time to enjoy the festivities. This pie is sure to be a crowd-pleaser and a great addition to your Easter menu!
Want recipes like this delivered straight to your inbox? Subscribe now to get the latest culinary creations you’ll love.
Why You’ll Love This Recipe
- Festive & Fun – The colorful layers of Jell-O make this pie perfect for Easter and any other springtime celebration.
- No-Bake – It’s easy to prepare and requires no baking, making it a hassle-free dessert.
- Creamy & Refreshing – The combination of the creamy filling and fruity Jell-O layers is both smooth and tangy.
- Customizable – You can change the flavors of the Jell-O to match your preferences or create a different color scheme.
- Make-Ahead – The pie needs a few hours to set, so it’s ideal for making ahead of time and storing in the fridge.
Ingredients You’ll Need
For the Pie:
- 1 pre-made graham cracker crust (or make your own)
- 1 (3 oz) box of strawberry Jell-O
- 1 (3 oz) box of lime Jell-O
- 1 (3 oz) box of orange Jell-O
- 1 (3 oz) box of yellow Jell-O
- 1 cup boiling water (for each Jell-O flavor)
- 1 cup cold water (for each Jell-O flavor)
- 1 (8 oz) package cream cheese, softened
- 1 (8 oz) tub of whipped topping (like Cool Whip)
- ½ cup powdered sugar
- 1 tsp vanilla extract
Tools You’ll Need
- Mixing bowls
- Whisk
- Spoon or spatula
- 9-inch pie dish
- Measuring cups and spoons
Step-by-Step Instructions
Step 1: Prepare the Jell-O Layers
- In separate bowls, dissolve each box of Jell-O in 1 cup of boiling water. Stir until completely dissolved.
- Once dissolved, add 1 cup of cold water to each bowl and mix well.
- Let the Jell-O sit at room temperature for about 10 minutes to slightly cool.
Step 2: Layer the Jell-O
- Pour the first flavor of Jell-O (e.g., strawberry) into the bottom of the graham cracker crust. Use a spoon to spread it evenly.
- Place the pie in the fridge for about 30 minutes to set, or until the first layer is firm to the touch.
- Once the first layer has set, carefully pour the next Jell-O flavor (e.g., lime) over the first layer. Be gentle to avoid disturbing the layer below.
- Refrigerate the pie for another 30 minutes to set this layer.
- Repeat this process with the remaining Jell-O flavors (orange and yellow), allowing each layer to set in the fridge before adding the next.
Step 3: Prepare the Cream Cheese Filling
- While the Jell-O layers are setting, make the creamy filling. In a mixing bowl, beat the softened cream cheese with an electric mixer until smooth.
- Add the powdered sugar and vanilla extract, and continue mixing until fully combined.
- Gently fold in the whipped topping until the mixture is smooth and fluffy.
Step 4: Assemble the Pie
- Once the final layer of Jell-O has set, spread the cream cheese filling over the top of the pie, smoothing it out to cover the entire surface.
- Return the pie to the fridge and chill for at least 3 hours or until completely set.
Step 5: Serve
- Before serving, garnish the pie with extra whipped topping or colorful sprinkles for an extra festive touch.
- Slice the pie and enjoy the refreshing, fruity layers combined with the creamy filling!
Tips for Perfect Easter Jell-O Pie
- Let Each Layer Set Properly – Be patient and allow each layer to set before adding the next one. This ensures clean, defined layers when you slice the pie.
- Use Room Temperature Cream Cheese – To avoid lumps in the filling, make sure the cream cheese is softened to room temperature before mixing.
- Experiment with Jell-O Flavors – You can change up the Jell-O flavors based on what you like or the colors you want for your pie. Blue, raspberry, and grape are great options for a different twist.
- Use a No-Bake Crust – If you’re short on time, you can buy a pre-made no-bake graham cracker crust, but if you want to go the extra mile, homemade graham cracker crust adds extra flavor and crunch.
Serving Suggestions
- Top with Fresh Fruit – Garnish your pie with fresh berries, like strawberries or blueberries, for added color and flavor.
- Serve with Whipped Cream – Top each slice with a dollop of whipped cream for extra creaminess.
- Add Easter-Themed Decorations – Use Easter sprinkles or mini chocolate eggs to make the pie even more festive.
How to Store & Reheat
Storing:
- Store the pie in an airtight container or cover it with plastic wrap to keep it fresh in the fridge for up to 3 days.
Reheating:
- This pie is served cold, so there’s no need to reheat it. Simply keep it chilled until ready to serve.
Frequently Asked Questions
- Can I use sugar-free Jell-O?
- Yes! You can use sugar-free Jell-O if you’re looking for a lighter option. The pie will still set perfectly and taste great.
- Can I make this pie ahead of time?
- Absolutely! This pie can be made up to 2 days in advance. Just be sure to keep it covered and refrigerated until serving.
- Can I use a different crust?
- While a graham cracker crust is traditional, you can use any type of crust you like. Try a cookie crust or a gluten-free crust for a different twist.
- How can I add more flavor to the cream cheese filling?
- You can add a bit of lemon zest, lime juice, or even vanilla bean paste to the cream cheese filling to make it more flavorful.
Final Thoughts
This Easter Jell-O Pie is the perfect treat to bring some colorful fun to your holiday table. The vibrant layers of fruity Jell-O, combined with the creamy filling, create a delicious and refreshing dessert that’s sure to please everyone. It’s easy to make, visually stunning, and deliciously light, making it the perfect addition to your Easter celebration.
Give it a try and let me know how it turns out! Don’t forget to leave a review and share your photos on Pinterest or in the comments below. I can’t wait to hear how you enjoy this festive dessert!
Preparation Time: 15 minutes
Chilling Time: 4 hours
Cuisine: American
Nutritional Information (Per Serving):
Calories: 220 | Protein: 3g | Carbohydrates: 25g | Fat: 10g | Fiber: 0g | Sodium: 120mg
Print
Easter Jell-O Pie
- Total Time: 15 minutes
Description
Celebrate Easter with this vibrant, fun, and easy-to-make Easter Jell-O Pie! With its bright and colorful Jell-O layers and creamy filling, this dessert is a beautiful and refreshing treat that’s perfect for the holiday season. Not only is it visually stunning, but it’s also light and delicious, combining the sweet tang of Jell-O with a smooth, fluffy cream cheese filling. Whether you’re hosting a family gathering or attending a potluck, this dessert is sure to be a hit.
Want recipes like this delivered straight to your inbox? Subscribe now to get the latest culinary creations you’ll love.
Ingredients
For the Pie:
-
1 pre-made graham cracker crust (or make your own)
-
1 (3 oz) box of strawberry Jell-O
-
1 (3 oz) box of lime Jell-O
-
1 (3 oz) box of orange Jell-O
-
1 (3 oz) box of lemon Jell-O
-
1 cup boiling water (for each Jell-O flavor)
-
1 cup cold water (for each Jell-O flavor)
-
1 (8 oz) package cream cheese, softened
-
1 (8 oz) tub of whipped topping (like Cool Whip)
-
½ cup powdered sugar
-
1 tsp vanilla extract
Instructions
Step 1: Prepare the Jell-O Layers
-
In separate bowls, dissolve each box of Jell-O in 1 cup of boiling water. Stir until completely dissolved.
-
Once dissolved, add 1 cup of cold water to each bowl and mix well.
-
Let the Jell-O sit at room temperature for about 10 minutes to slightly cool.
Step 2: Layer the Jell-O
-
Pour the first flavor of Jell-O (e.g., strawberry) into the bottom of the graham cracker crust. Use a spoon to spread it evenly.
-
Place the pie in the fridge for about 30 minutes to set, or until the first layer is firm to the touch.
-
Once the first layer has set, carefully pour the next Jell-O flavor (e.g., lime) over the first layer. Be gentle to avoid disturbing the layer below.
-
Refrigerate the pie for another 30 minutes to set this layer.
-
Repeat this process with the remaining Jell-O flavors (orange and yellow), allowing each layer to set in the fridge before adding the next.
Step 3: Prepare the Cream Cheese Filling
-
While the Jell-O layers are setting, make the creamy filling. In a mixing bowl, beat the softened cream cheese with an electric mixer until smooth.
-
Add the powdered sugar and vanilla extract, and continue mixing until fully combined.
-
Gently fold in the whipped topping until the mixture is smooth and fluffy.
Step 4: Assemble the Pie
-
Once the final layer of Jell-O has set, spread the cream cheese filling over the top of the pie, smoothing it out to cover the entire surface.
-
Return the pie to the fridge and chill for at least 3 hours or until completely set.
Step 5: Serve
-
Before serving, garnish the pie with extra whipped topping or colorful sprinkles for an extra festive touch.
-
Slice the pie and enjoy the refreshing, fruity layers combined with the creamy filling!
Notes
Let Each Layer Set Properly – Be patient and allow each layer to set before adding the next one. This ensures clean, defined layers when you slice the pie.
Use Room Temperature Cream Cheese – To avoid lumps in the filling, make sure the cream cheese is softened to room temperature before mixing.
Experiment with Jell-O Flavors – You can change up the Jell-O flavors based on what you like or the colors you want for your pie. Blue, raspberry, and grape are great options for a different twist.
Use a No-Bake Crust – If you’re short on time, you can buy a pre-made no-bake graham cracker crust, but if you want to go the extra mile, homemade graham cracker crust adds extra flavor and crunch.
- Prep Time: 15 minutes
- Cuisine: American
